Based on an article that first appeared in The Iaido Newsletter #74 8/10, October 1996. Copyright © EJMAS 2000. All rights reserved.
Introduction
I've been making wooden weapons for twenty years now and as I'm still not bored, I thought perhaps some readers also might get some enjoyment out of the hobby. Therefore I've provided some instruction here. Those who read this but still don't want to try making their own can get information about buying these weapons by looking at the Sei Do Kai catalogue. You should also check out the EJMAS shopping pages under equipment for photos of wood for weapons, you can buy them there as well.
Since I practice Japanese martial arts, my experience lies mostly in making Japanese weapons (bokuto, bo, jo, and other such things). However, wood is wood and the suggestions given below apply to any wooden weapon, whether a French cane, an Irish bata, or a Zulu knobkerrie.
I hope these notes will spur some of you to try your hand at the process. There's nothing like using a weapon you made for yourself.
Design Considerations
A good stick should last years. Therefore it should be chosen carefully. Factors to consider include the following:
If buying a custom-made weapon, price may be a consideration, but if you are making your own price is essentially irrelevant. After all, the most expensive North American hardwood sells for less at the lumber store than the cheapest junk from the martial art store. Factors that are important, however, include weight, strength, and crush resistance.
Grain Traits
Grain affects both strength and appearance. Basically, a wildly irregular grain usually looks better than a straight tight grain, but a straight tight grain is usually stronger.
Grain refers to the stratification of wood fibres. Although climatic conditions affect grade, in general trees have a tighter grain toward the outside than in the centre. The reason is that the grain is a function of how much wood relative to the whole cross section the tree can produce in a season, and older trees put down tighter rings at their edges.
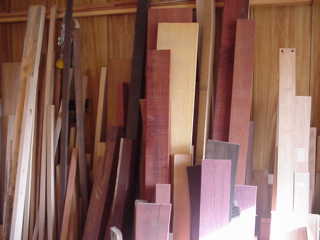
Some of the raw materials used for bokuto.
However, how much old growth is still around? Not much. As a result you have to be careful with wood selection, as young trees commercially harvested are rarely as tightly grained as the old stuff.
Desirable grain traits include:
In technical terms, assume a 40"-long board 1" in diameter. If the grain runs out at 20", the board is said to have a grain slope of 1 in 20 and it retains at least 93% of its strength along its length. If the grain runs out at 10", then the board has a 1 in 10 slope and it retains 81% of its strength. On the other hand, if the grain runs out 5 inches along the blade, it is down to 55% of its strength, and if the grain runs at 45 degrees (a 1-to-1 slope), then the wood has less than 10% of its potential strength.
North American Hardwoods
If you buy a commercial stick, it is likely made of ash or red oak, both of which are fairly cheap but neither of which is very dent resistant. Since you are making your own stick, you aren't worried about pinching pennies, instead you want a stick that looks spectacular, is strong as hell, or both. The following are my recommendations, these woods are all readily available throughout North America, and probably Europe, too. Latin names and technical descriptions are easily available via the Internet, so are not given here.
Ash: White ash is the light, strong wood used to make most commercial tonfa. Unfortunately its open pores make it "crushable" like oak. Nevertheless a tight-grained piece makes a good weapon for smaller students or beginners who can't safely use heavier weapons.
Hickory: Hickory often shows heartwood and sapwood of two different colours, one slightly harder than the other, and can be quite attractive. The First Nations peoples made their war clubs from hickory, and it is also my personal favourite. The wood has excellent crush resistance and strength plus comparatively light weight. It is suitable for heavy practice because when it breaks, it tends to split without letting pieces go flying about. Indeed, hickory's only drawback is that it is slightly "shaggy" and so may need to be sanded once in a while as the hairs lift with moisture from your hands.
Oak: Tight-grained pieces of old growth white oak make excellent weapons. However, the fast growing cycles and small diameters of some modern oak result in poor crush resistance due to porous grain. Red oak, pin oak, etc. are not suitable for high impact practice due to their open grain, but the pores in white oak are filled with waxy tylose residue that reduces crushing. The "magical" (some people think they're indestructible) wooden weapons one gets from Japan (shiro kashi or aka kashi, white or red oak) are Quercus mongolica, whereas North American white oak is usually Quarcus alba. Quarcus mongolica is more tightly grained than North American white oak, but more importantly, has a greater infill of the cells and as a result seems "heavier" (denser) and less liable to crush and dent.
Maple: Hard maple has good crush and dent resistance and a tight grain, and has sufficient strength and weight for everyday practice. Unfortunately, it is not suitable for heavy practice because when it breaks (and ALL wood eventually breaks), pieces go flying across the room. Nevertheless it is beautiful to look at and hold. Beech is like maple, just not as pretty.
I've used other woods such as cherry but while it is very pretty the suitability depends more on the piece of wood than the species. Meanwhile our local ironwood is hophornbeam, sometimes called muscled (or rippled) beech. It's a very white wood, light but with a lot of strength. I've been using it a bit lately when I can find a good piece.
Exotic Woods
Here are some of the more exotic woods I've used to make wooden weapons. WARNING: There is such a thing as carpenter's cancer (nasal cancer) and these exotics with their resins are probably great for causing it. Some of these woods can cause an almost instant irritation so be careful. I mention this here because ipe sent me into sneezing fits almost immediately (as opposed to purpleheart, which took a while). Macassar ebony dust has the same effect as inhaling chilli peppers. Wear a proper dust mask.
Afromosia: An attractive brown with yellow stripes, this West African hardwood is moderately heavy and is a bit brittle, therefore it could give splinters.
Bloodwood: This wood from the Amazon region has to be one of the nicest "weapon-grade" hardwoods I know. It is a joy to work with.
Brazilian Blackheart (redheart): This used to be imported as an ebony substitute, but it has a bad habit of dulling tools. This is the strongest wood I've ever seen, I weigh 230 pounds, my Tachi Uchi no Kurai (iaido partner practice) partner weighs at least that much, and we use a pair of these to demonstrate full stop blocks against full strength strikes. These things don't even dent, though I did once accidentally slice a piece off one of them using a "semi-sharp" aluminum iaito. Before the clamour to find and import this wood begins, I should mention that it is not really the perfect wood for weapons because it also has a tendency toward checks (cracks in the face). It's also heavy as blazes.
Bubinga: This wood from equatorial West Africa has light-yellow sapwood with red-violet stripes. It's fairly light and great fun to work with. Sadly, it is not so popular with the customers.
Cocobolo: Deep red with black stripes and swirls, and very heavy, cocobolo is a Central American true rosewood (Dalbergia sp.), as are kingwood and tulipwood. The grain tends to be screwy but it is so tight it usually doesn't matter. When working with cocobolo, tools must be kept very sharp as the wood can literally bounce a spokeshave off of itself. It is a great weapon wood, and I've sold every weapon I've ever made with this wood.
Ebony, African: African ebony comes from Madagascar and West Africa. On those rare occasions I find a piece big enough for a weapon I have to charge a couple hundred dollars for it! A beautiful wood though.
Ebony, Ceylon: Ceylon ebony is a VERY expensive black wood from southern India. It is hard to find in suitable grain patterns (as if you could see the grain in some pieces), and due to unseen stress cracks inside the wood I've seen Ceylon ebony weapons literally explode on contact. But anybody who takes a stick whose wood costs this much and smacks it against something hard deserves to have it break.
Ebony, Makassar: Makassar ebony is a moderately heavy wood from SE Asia that is coloured black with brown stripes. The wood is fairly strong, but due to cost -- enough for a sword costs over CDN $100 -- ebony weapons are more suited for lone practice (suburi) than partner practice.
Ipe: Another very hard South Central American wood. This one is a light to dark brown that, with a good finish, shows rainbow flecks that make it look like you are actually seeing into the wood. It's not as heavy as blackheart, but not much is. The sanding dust from this wood is green and turns blood red when you wash with soap. Ipe ranks among my current candidates for "toughest weapon material".
Kingwood: Very pretty, very expensive, and from Brazil, this wood is more for looks than for partners. It is not as flashy as cocobolo or tulipwood, but very elegant.
Lignum Vitae: This slightly greenish wood from South and Central America is the heaviest wood around. It's fairly strong, too and is used in steamships as a bearing for the underwater propeller shafts. Unfortunately due to poor forest practices it has become an endangered species and as a result pieces large enough to make into weapons are becoming hard to find. Still, I made a weapon with it once, and even with a crack it would pound anything else to pieces. Recently I've found some larger pieces and should be able to make a bokuto or two in the next couple of years.
Osage Orange: The Indians of the Southwestern United States used to make lances and bows from this deep yellow wood. Unfortunately it is a real bear to work with, the grain wanting to rip out no matter which way you work it. Good pieces are somewhat hard to find.
Padauk: A deep red wood from Central and West Africa, padauk is not too bad to work with but quite a bit more splintery than bloodwood.
Pau Ferro: Although the dust from this Brazilian wood is toxic, it is so good looking that I occasionally make weapons of it. It's the local "ironwood" of its range and it earns the name, very hard.
Purpleheart: This Central and South American wood has a deep red colour and a nice straight grain. It can be a bit crushable because it's so stiff, but still makes an excellent weapon wood, especially if you want a bit more weight.
Teak: Heavy and strong but too soft, it dents easily. Nice and waxy so finishing is not too important. It's from Burma and Thailand.
Tulipwood: Not the North American wood that is actually poplar (Liriodendron tulipfera), but instead the Brazilian hardwood that (legend has it) some company in England made sports car frames out of. The wood is red with cream stripes and has good properties but it is expensive and hard to find a good piece.
Wenge: I have made exactly two bokuto from this Central African wood, no more. I've never met a more irritating dust or more painful splinter. The only thing that ever came closer to instant rejection was mansonia, which stinks something awful when you cut it.
Ziricote and Bokote: These are often called rosewoods but are Cordia sp. rather than Dalbergia sp. Both are brown woods with black grain, the ziricote tending to be blacker and harder. Ziricote also produces a very irritating dust, and as a result I prefer working with bokote. Both woods are best used for show but will stand light partner work. (Well, heavy work if used only against anything bought in the local martial arts store). Both are from Mexico and Central America. Zebrawood looks very much like bokote, but is lighter and not as resinous.
I've probably tried a few more woods but can't remember them right now. If anyone wants to try another let me know and I'll tell you if I've used it.
Stuff That Is Not Wood
Rattan is a vine rather than a wood. It does not have much fibre connection and so tends to go floppy when used rattan-on-rattan, and to shred when used against hickory or other hardwoods. As it has to be replaced frequently and usually has to be shipped rather than purchased locally, rattan is often more expensive in the end than a good wooden stick.
I'm not a big fan of rattan for working weapons, but it's fine to whack partners with.
Selecting Wood at the Store
For making a first weapon I'd recommend maple. It's a nice wood to work and can be found easily. Hickory is a bit more difficult to find since it isn't really a woodworker's wood. (More a toolmaker's wood, used for ax handles and whatnot). Poplar is showing up in some of the lumberyards around here, but it's a bit soft.
If you're wondering about a new wood, try the thumbnail rip and bend test. If this sounds painful, let go of your thumbnail.
Branches, saplings, and roots can be stronger than turned sticks, but it depends on knots, grain, and other factors and is not a guaranteed thing. Considerable experience is required to know the difference, and therefore beginners should stick to wood they buy from the store.
But if you're cheap, go to the woods and find a suitable hardwood sapling. Be sure to obey all forest laws! If you want the knob for a knobkerrie or whatever, then pull it up so that the root remains. In any case cut it off longer than you need.
Next, let the wood dry for a year or so. To prevent cracking, paint or wax the ends before putting it away to dry. (It's the faster water loss out of the end grain that causes splitting.)
Some people try to speed the drying process by using polyethylene glycol to displace the water. However, this is not recommended because the stick still retains the qualities of green wood rather than dry, and wood gains strength as it gains density (as it dries and shrinks).
Other people try heat. Note, however, that under ideal conditions air-dried wood is a bit tougher to break than kiln-dried wood. The reason is that the air-dried wood retains a slightly greater percentage of moisture. (The percent moisture for air-dried hardwoods of medium density is 15-20% while the percent for the same wood dried in a kiln is 12-15%.) This increased moisture means that the wood retains some of the properties of green wood. That is, it's more flexible, less brittle, and therefore less likely to snap.
However, under less-than-ideal situations, air-dried wood is subject to fungal growths that destroy the wood.
Therefore it is all a balance of properties. Drier wood is harder and won't dent as easily; wetter wood is more flexible and not as subject to splitting and breaking. Wetter wood is heavier and so has more impact power, drier wood is lighter and can be moved faster.
No matter how you decide to dry your stick, be sure to store the green wood out of the direct sunlight, as even a few hours can cause one side to dry faster than the other, thus resulting in a permanent warp. Direct sun on properly sealed and dried sticks is less of a problem, but can still result in hairline cracks called checking, and these in turn lead to unexpected breaks.
Finally, make sure that you store your drying wood flat. Wood that is dry resists bending, so wood that is bent during drying stays bent. Yes, small pieces can be subsequently unbent using steam, ammonia, heat, and presses applying pressure for weeks, but it is much easier to dry the wood straight in the first place.
Making the Weapon
With a few basic tools it is not hard to make a complex-shaped wooden weapon such as a curved sword or war club.
The first consideration is which wood to use. The choice will depend on what style of weapon is being made and whether or not it is to be used for partner practice. Once a source of suitable wood is found the actual piece must be chosen. Use a board that is about one inch thick and at least two inches wide for a Japanese sword. As noted above, the grain must be straight and preferably run along the wide dimension of the end of the board rather than across it.
Next you have to condition your wood. If at all practical, buy your wood and store it for several months to a year in conditions similar to your practice place. This will ensure that the wood is at a proper humidity level and any faults that are going to develop will do so before you start working.
Third, lay out a pattern. Here I'm describing how to make a bokuto, which is a wooden weapon made to resemble a Japanese sword. But the idea applies regardless of what kind of weapon you have in mind.
The easiest way of laying out a pattern for the curve is to copy a weapon you like. If you don't have a pattern then cut the board to about 41 inches long and at least two inches wide. Check grain patterns to determine which end of the board is weakest, that will be your handle. If the grain has a curve then the curve of the sword will follow it. Decide how far along the blade the bottom of the curve will be. For koshi-zori blades the point of maximum curve is close to the handle, for other styles (tori-zori) it is closer to the middle of the blade. Saki-zori blades have the maximum curve toward the tip. Mark out a curve so that the bokuto is about one and a half inches tall (from ha to mune, edge to back). The top of the handle and the point will touch one side of the board. The point of maximum curve on the edge touches the other side if the board is 2" wide. Cut out this sword blank using a band or sabre saw. (I even used a 5-1/4 inch circular saw for a few blades when I had nothing else. The small blade will make this curve.)

Cutting the pattern out of an ash board using a sabre saw.
Now decide what tip shape you desire. Some sword styles leave the point blunt while others use a modified point. The commercial bokuto mimic the point of the katana. If you want a point, cut the end at the angle preferred.
If your bokuto is going to taper toward the tip (it should to look good), and you have access to a jointer, mark the taper on the concave and convex sides and by using a series of longer and longer passes over the blades, create the taper on the sides of the blade. If you don't have a jointer you'll simply do this by hand when shaping the blade.
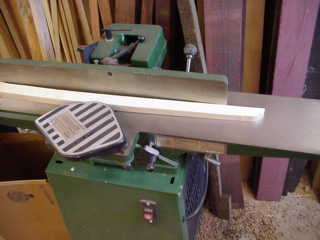
Tapering the side on a jointer.

Another view of tapering the side on a jointer (guard swung aside to show the blades).
To carve out the shape some people prefer a wood rasp, some a plane. I prefer a combination of a spokeshave and a Stanley Surform® rasp depending on which wood I am using. I have a Black & Decker Workmate® bench that is about the correct height for me to work on. If you don't, well, adjust according to what you have.
Start with the blade first and do the handle last. The reason is that the squared handle will allow you to keep the blade in the correct orientation while creating the long straight lines needed to produce a good looking bokuto.
Clamp the wood so that you can cut out the back ridge. For this you also need to have the blade clamped straight up and down. Hold the spokeshave at the chosen angle and use long smooth strokes to cut the shoulders. A 45-degree angle will make a round looking blade while an angle more toward vertical will create a thin blade. Which you prefer is a matter of taste.
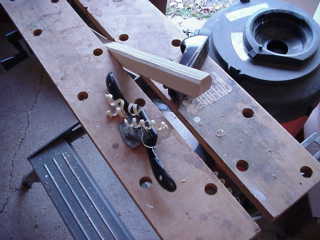
Shaping the bokuto with a spokeshave and a Surform® (bokuto tucked under struts on Workmate®)
Another view of the bokuto tucked under struts on Workmate®
Once you have cut these shoulders to a straight pleasing line, then you can start on the edge. To make the edge, turn the wood over and work the curve into the bottom of the blade. A more rounded edge will create a stronger sword with a more resistant striking surface while a sharper edge will create a more visually pleasing shape. Whichever edge you choose, make sure that the edge lines up with the top of the blade. Clamping the squared handle will help with this. The edge will want to wander as you cut so be careful.
The way you taper the blade toward the tip determines the sword's balance. If you want to replicate the katana point use a Surform® to cut a plane in from each side at the tip. If there is to be no point or a modified point then use the Surform® to round off the edges of the tip and the base of the handle.
Next, even out any wavers in the lines along the back.
Once that is done, carefully clamp the blade. Be sure to put pieces of scrap between the clamps and the blade, otherwise you will leave unwanted indentations. Now carve out the handle. This is an important step since the handle is what you grip and the angle must agree with the curve of the blade. As a rule the handle should be an oval shape with the long axis arranged so that you know where your blade edge is facing. In other words, the top and bottom of the oval must line up with the back of the blade and the edge. For a more sophisiticated grip use an egg shape with the narrower curve on the edge side.
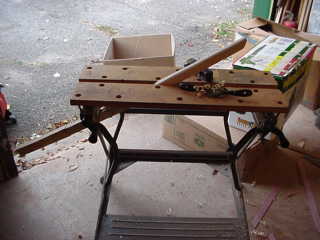
If you have access to a fixed belt sander, you can use both hands to smooth the wood. Your straight lines will be straighter that way, and a lot of shaping can be done using the 36-grit belt. If the sander has a large flat bed you will have to create a padded "hump" on the bed with foam and masking tape so that the belt moves in a curve to fit the concave mune.
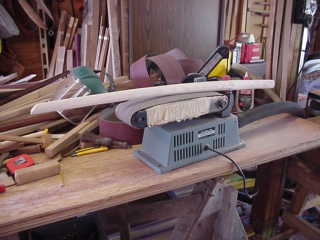
Sanding the bokuto on a belt sander; note the foam pad under the belt. Also note the neat and tidy work bench.
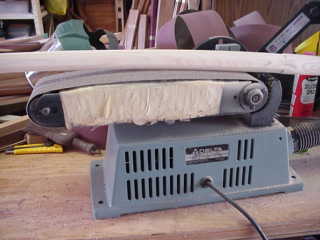
Another view of the bokuto on a belt sander.
If you don't have a sander, then you can use hand tools. However, you will also have to work much more carefully to prevent blisters on your hands. Use several grits of sandpaper to smooth the wood and close the pores.
After sanding, apply boiled linseed oil or tung oil. Do not use surface finishes like varnish or urethane; even Danish wood oil is a bit much. These create a sticky surface that will give you blisters while an oil finish allows the wood to soak up the sweat on your hands without causing the grain to lift too much.
If you use linseed oil make sure it is boiled -- raw oil will never dry. I prefer tung oil.
Making a Cane, Stick, or Staff
The previous advice was for people making weapons that resembled swords.
The following advice is for people who want to make tapered round sticks but do not have lathes. You'll need (ideally) a band saw, a table saw, a spokeshave and a plane. By the way, this took me a lot of years to figure out, so anyone who thinks they may make a round stick for themselves one day, pay attention and save yourself a lot of work and thought.
On the table saw, cut the wood square to the maximum width you want. Usually this is 1" (yes I do work in English measurements in a metric country, 1" is 2.54 cm, 1000 mils, and 0.85 sun) or sometimes 1-1/8". I'll assume you want to make a six-foot staff measuring 1" in the centre and 3/4" at the tips.
To taper the wood, mark the piece from the maximum width in the centre (or 6" either side of the centre or whatever you prefer) to 1/8" in from each side at the tips. Draw lines and then plane this taper into the four sides. Make the lines as straight as you can get them. That's 8 surfaces to plane in all.
Now carefully mark out lines on opposite sides. The ratio is 3-4-3. For those of you less mathematically inclined:
Set the band saw to make a 45-degree cut and cut along the lines. This will give you an octagonal shape with almost equal sized planes.
Go to the spokeshave and round the edges off the octagon as smoothly as possible.
Then go at it with sandpaper and finish the job.
If you don't have the table saw and band saw:
If the weapon feels good in your hands and is the right weight, then appearance is not important. It is a tool and it will soon be banged up so don't worry if it is not a museum piece. Meanwhile, if you treat it with the proper care it will be useful for many years of hard service.
The most important advice is to keep your stick out of the sunlight and away from heat sources, and to reapply a tung oil or boiled linseed oil finish every few months. (Hard surface finishes such as varnish make the handle sticky while mineral oil requires frequent applications and feels slimy.)
It is also important to pay attention to relative humidity, as sudden changes may cause the wood to warp, crack, or check (small cracks in mid-board). Note that air-conditioning creates a very dry environment, so a weapon flown from an indoor training area in Arizona to an outdoor training area in Hawaii is at slight risk. Ideally you would not take your Arizona weapon out of its bag for a month or two upon arrival, but if that's impossible then it might be better to take a less-favoured stick.
All wooden weapons are ideally stored flat rather than stood in the corner, but there is no reason that a properly dried stick cannot be stood in the corner for a few weeks without noticeable warp. Weapons made of green wood are another matter altogether.
Finally, consider transporting your weapon in a bag. Not only does this protect its finish from nicks caused by car trunks and windows, but it also provides some protection from sudden changes in humidity and more importantly, heat. Whether this bag is cloth, leather, nylon, or vinyl is mostly a matter of esthetics.
Conclusion
There you have it -- how to select the proper wood, how to make a complex wooden weapon having lots of curves, and how to make a round tapered stick. For photos of some weapons that I've made, check out http://sdksupplies.netfirms.com/thumb.htm
Have fun making your first weapon. Write and tell me how it went.
kataylor@ejmas.com